Extraction happens in two places in Wall World Strategy: you put Gathering Posts on the surface next to mineral deposits, and you send miners into the fissures and caves inside the Wall. This Wall World Strategy mining and resource gathering guide covers where the deposits are, what the panel on a post is telling you, and the one hole in the Wall that players lose hours to.
The Wall World Strategy mining and resource gathering guide, in order
The official loop is: start with basic resource extraction and gradually build a more complex economy, explore the depths of the Wall, search for stable resource deposits, and develop the infrastructure needed to use them efficiently.
In practice that splits into two jobs with different rules. A surface post is a building you place and staff. A fissure is a place you send workers into and have to check on, because the game will not tell you when they stop.
- Find the surface deposits. The starting map has two iron deposits and one biomass deposit below the Core.
- Slot one post between them. A single gathering post can draw on all three at once, which is the economical opening — one post instead of three.
- Leave it unpaved. Resource extractors are the one structure that does not need a road back to the Core.
- Staff it yourself. Open the post and fill the Labor Force slots — Miners, Engineers and Workers — by hand.
- Open a fissure and pick the blocks. Miners break the blocks you designate, and the ore that drops on the ground has to be hauled out.
- Go back and check on it. Nothing tells you when fissure miners stop working.
- Then push deeper. The same extraction loop applies to the lower layers of the Wall, where the larger deposits sit.
One post can serve three deposits
The starting map has two iron deposits and one biomass deposit below the Core. It is possible to slot a single gathering post between them so that one post draws on all three at once, which is the economical arrangement and the reason you can start with a single extraction building instead of three.
Which resource that post should be feeding first is a different decision, and it is the decision that decides whether the first wave arrives on a colony with guns or without. The early game resource priority guide works through that order.
Posts do not need a road
Resource extractors are the one structure that does not need to be paved back to the Core. You can drop a post next to a deposit on bare rock, which makes it the first thing you can put up in the opening hours without any road work at all.
One caveat from the demo: extraction posts should be movable, but they were not. If you place a post badly, you are not moving it, you are paying to demolish it and building another one. Everything else on the map follows the road rules in the foundations and roads guide.
What the Gathering Post panel tells you
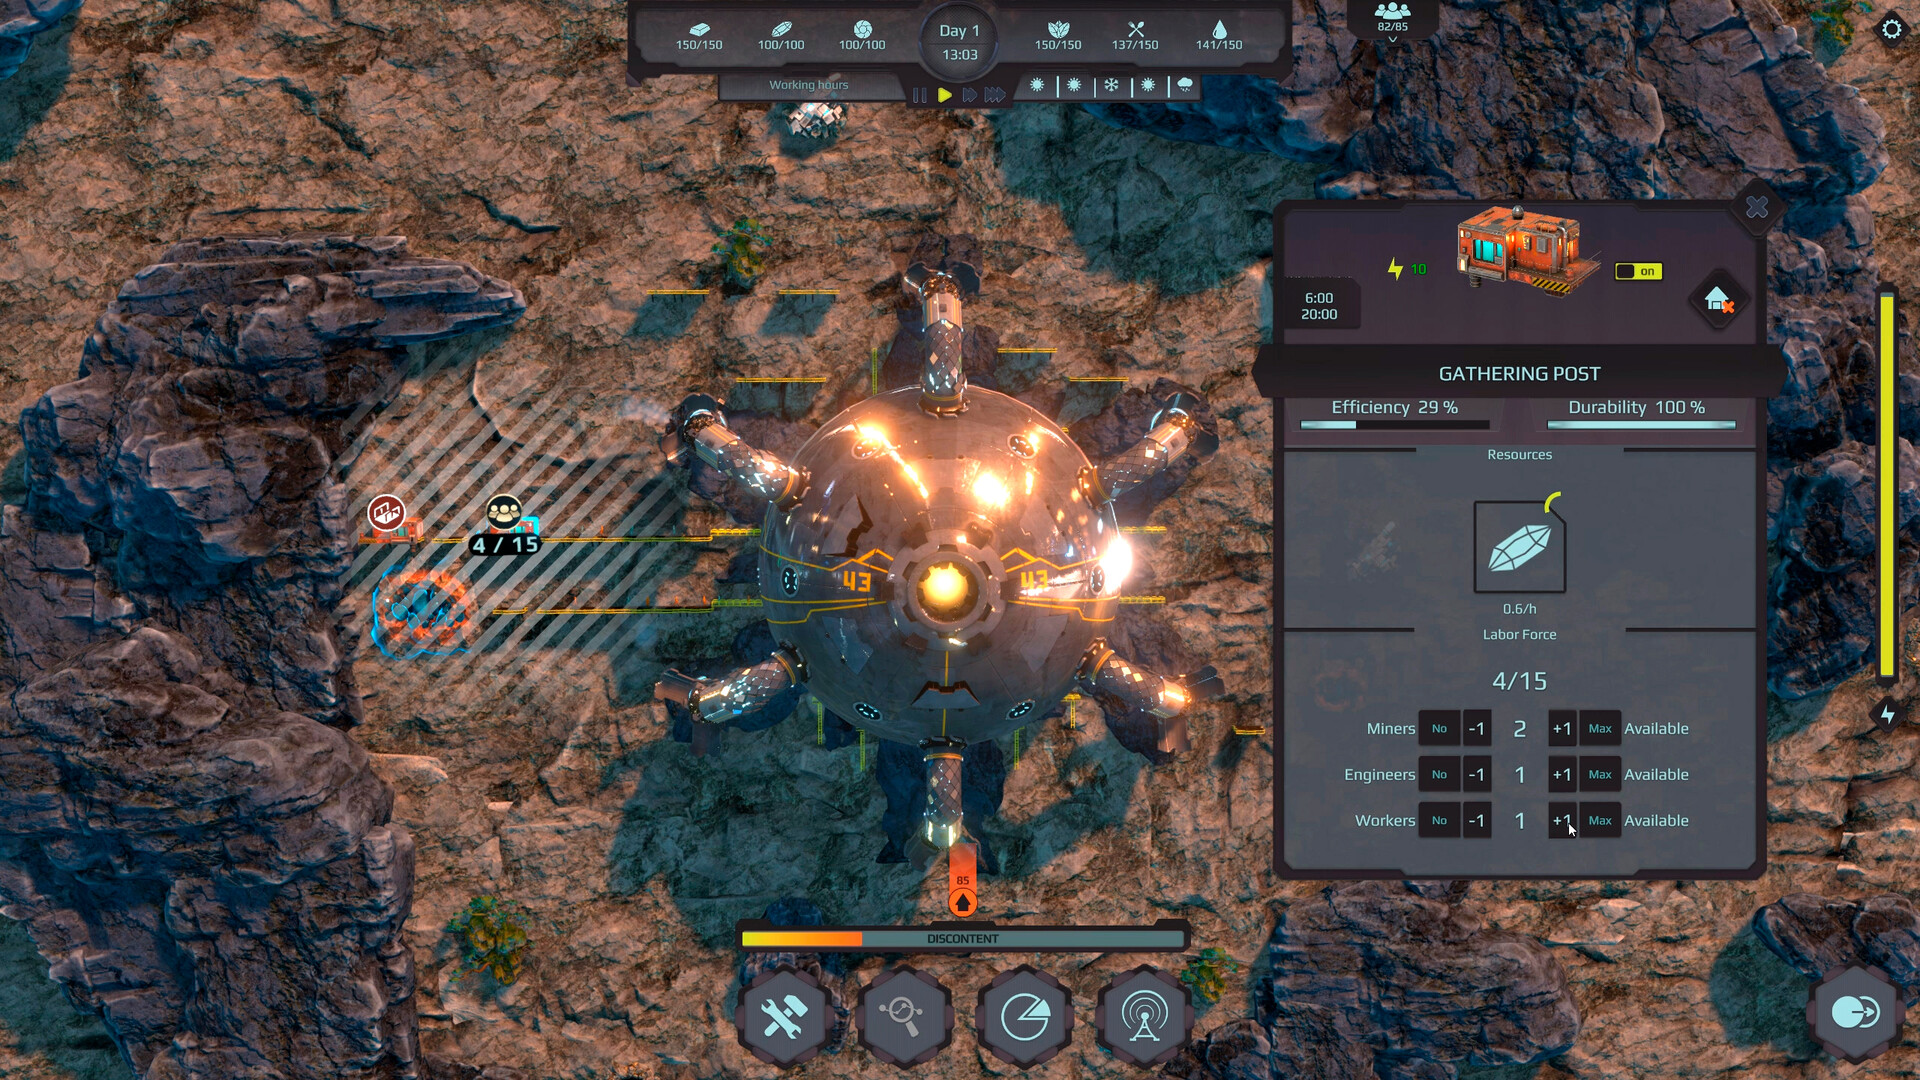
Open a post and you get three things.
- Efficiency. How well the post is working against the deposit it is on.
- Durability. How much wear the post has taken.
- Labor Force. A counter with Miners, Engineers and Workers slots that you fill or reduce by hand.
That last one is the control that matters early. Labor is the colony's scarcest resource after metal, and every post you staff takes people away from the buildings that need them.
Mining fissures inside the Wall
Fissures and caves are worked differently from the surface. You pick the blocks for the miners to break, and the ore that drops on the ground has to be hauled out.
- In the demo the haul-out was manual and easy to miss. The 2026 demo patch changed it so miners automatically collect mined resources when they are available.
- A Warehouse upgrade lets you build miners directly on holes, although in the demo it appeared to have no effect.
- Nothing tells you when fissure miners stop working. There is no indicator, so you have to keep checking on them while you are busy building, and especially before a wave arrives.
- The readouts are rough. A per-post metal-per-hour display showed 6 on a post that should have been 12 by the player's own arithmetic.
The same patch list also fixed miners flying around empty excavation points, so the constant circling you may have seen is not something you have to design around.